Imaging: Web GUI
Copy files to a file server
Open the Web GUI website and log in (ask Simon Ball or Horst Obenhaus for log in credentials if this is your first log in)
Go to Imaging -> BaseFolders -> Add BaseFolder
Fill out the details in the mask on that website. Make sure you get the session logic combined right. It determines how sessions and recordings are created in the database. This only has relevance for data acquired with scanimage (miniscope, …). See Suite2p: Combined logic. For femtonics recordings this function is not implemented and has to remain on “no” (not combined).
Experimenter: select your username from the list.
File path: specify the file path to where your raw data is stored.
Combined?: See Suite2p: Combined logic. For the Femtonics this must be “no”.
System Configuration: Select which microscope type you used (Illuminato = Femtonics).
Scope model: for miniscope users only, select which model you used.
Animal ID in mLIMS: the animal ID of your furry collaborator as registered in mLIMS.
Suite2P python options: this selection determines how Suite2p, which is incorporated into the pipeline, analyses your data. You can make your own set of options (see Create a new suite2p options file for your data) that work best with your data, but for now just choose an existing one and see how that works first.
Session Note: optional, add any additional notes relevant to the session

Click “Submit” and refresh the page or go to Imaging -> BaseFolders -> View BaseFolders
Is there a green tick mark next to the session you just ingested? All is well and you can continue.
Is there an orange X instead? Contact Simon Ball
Check the Search -> Search Recordings (Imaging) subpage in the web GUI:
Your newly added recordings should pop up there.
If you have deep lab cut (DLC) data, you have to associate a Model | ProcessingMethod combination on a per session basis. Valid selections will be shown to you when you click on the blue DLC button. After that (or if you do not have any DLC data), you can click on the red None icon to fill out your session type and apparatus info. This will make sure that the correct session and apparatus information is found by downstream processes.
If the session was an object session, you can use the Enter object locations Napari Jupyter notebook, which lets you specify details (location, type) of objects in the arena.
If it was e.g. a headfixed wheel session, click the Wheel button to associate the correct apparatus to the session
Check whether the imaging analysis has run through (only Suite2P at the moment). This information can be retrieved under Imaging -> Suite2p -> Finished Suite2p Jobs.
Can’t see your session there? Check if a suite2p folder has been created in the same folder as your raw data. If so, it probably just need more time. If not, contact Simon Ball.
Curate the imaging analysis results (see Identify cells to keep)
Once you are happy with the results, re-add the session BaseFolder to the web GUI. Use the same information as when you added the BaseFolder the first time (take care of Suite2P options and combined status). There is a convenient way of doing that: Just click the button “Add” behind the session under Suite2p -> Finished Suite2p Jobs in the web GUI.
Datajoint will re-ingest the BaseFolder, but only add information that has been missing before (the imaging analysis (Suite2P) output.
Lean back and watch things being calculated (web GUI: Imaging -> Miscellanious -> Jobs).
Go through the notebooks to make sense of your analysis results or use the Imaging: Recording Viewer to inspect the results (the GUI is work in progress, so don’t expect too much right now).
Suite2p: Combined logic
Combined addresses how a group of Recordings are analysed via Suite2p.
Summary:
If
combined == yes, then all Recordings in the Basefolder will be grouped as a single Session and analysed together, resulting in consistent unit IDs.If
combined == no, then each Recording will be assigned to its own Session, and be analysed separately, such that a unit ID in the first session will not necessarily correspond to the same unit ID in another session
Details:
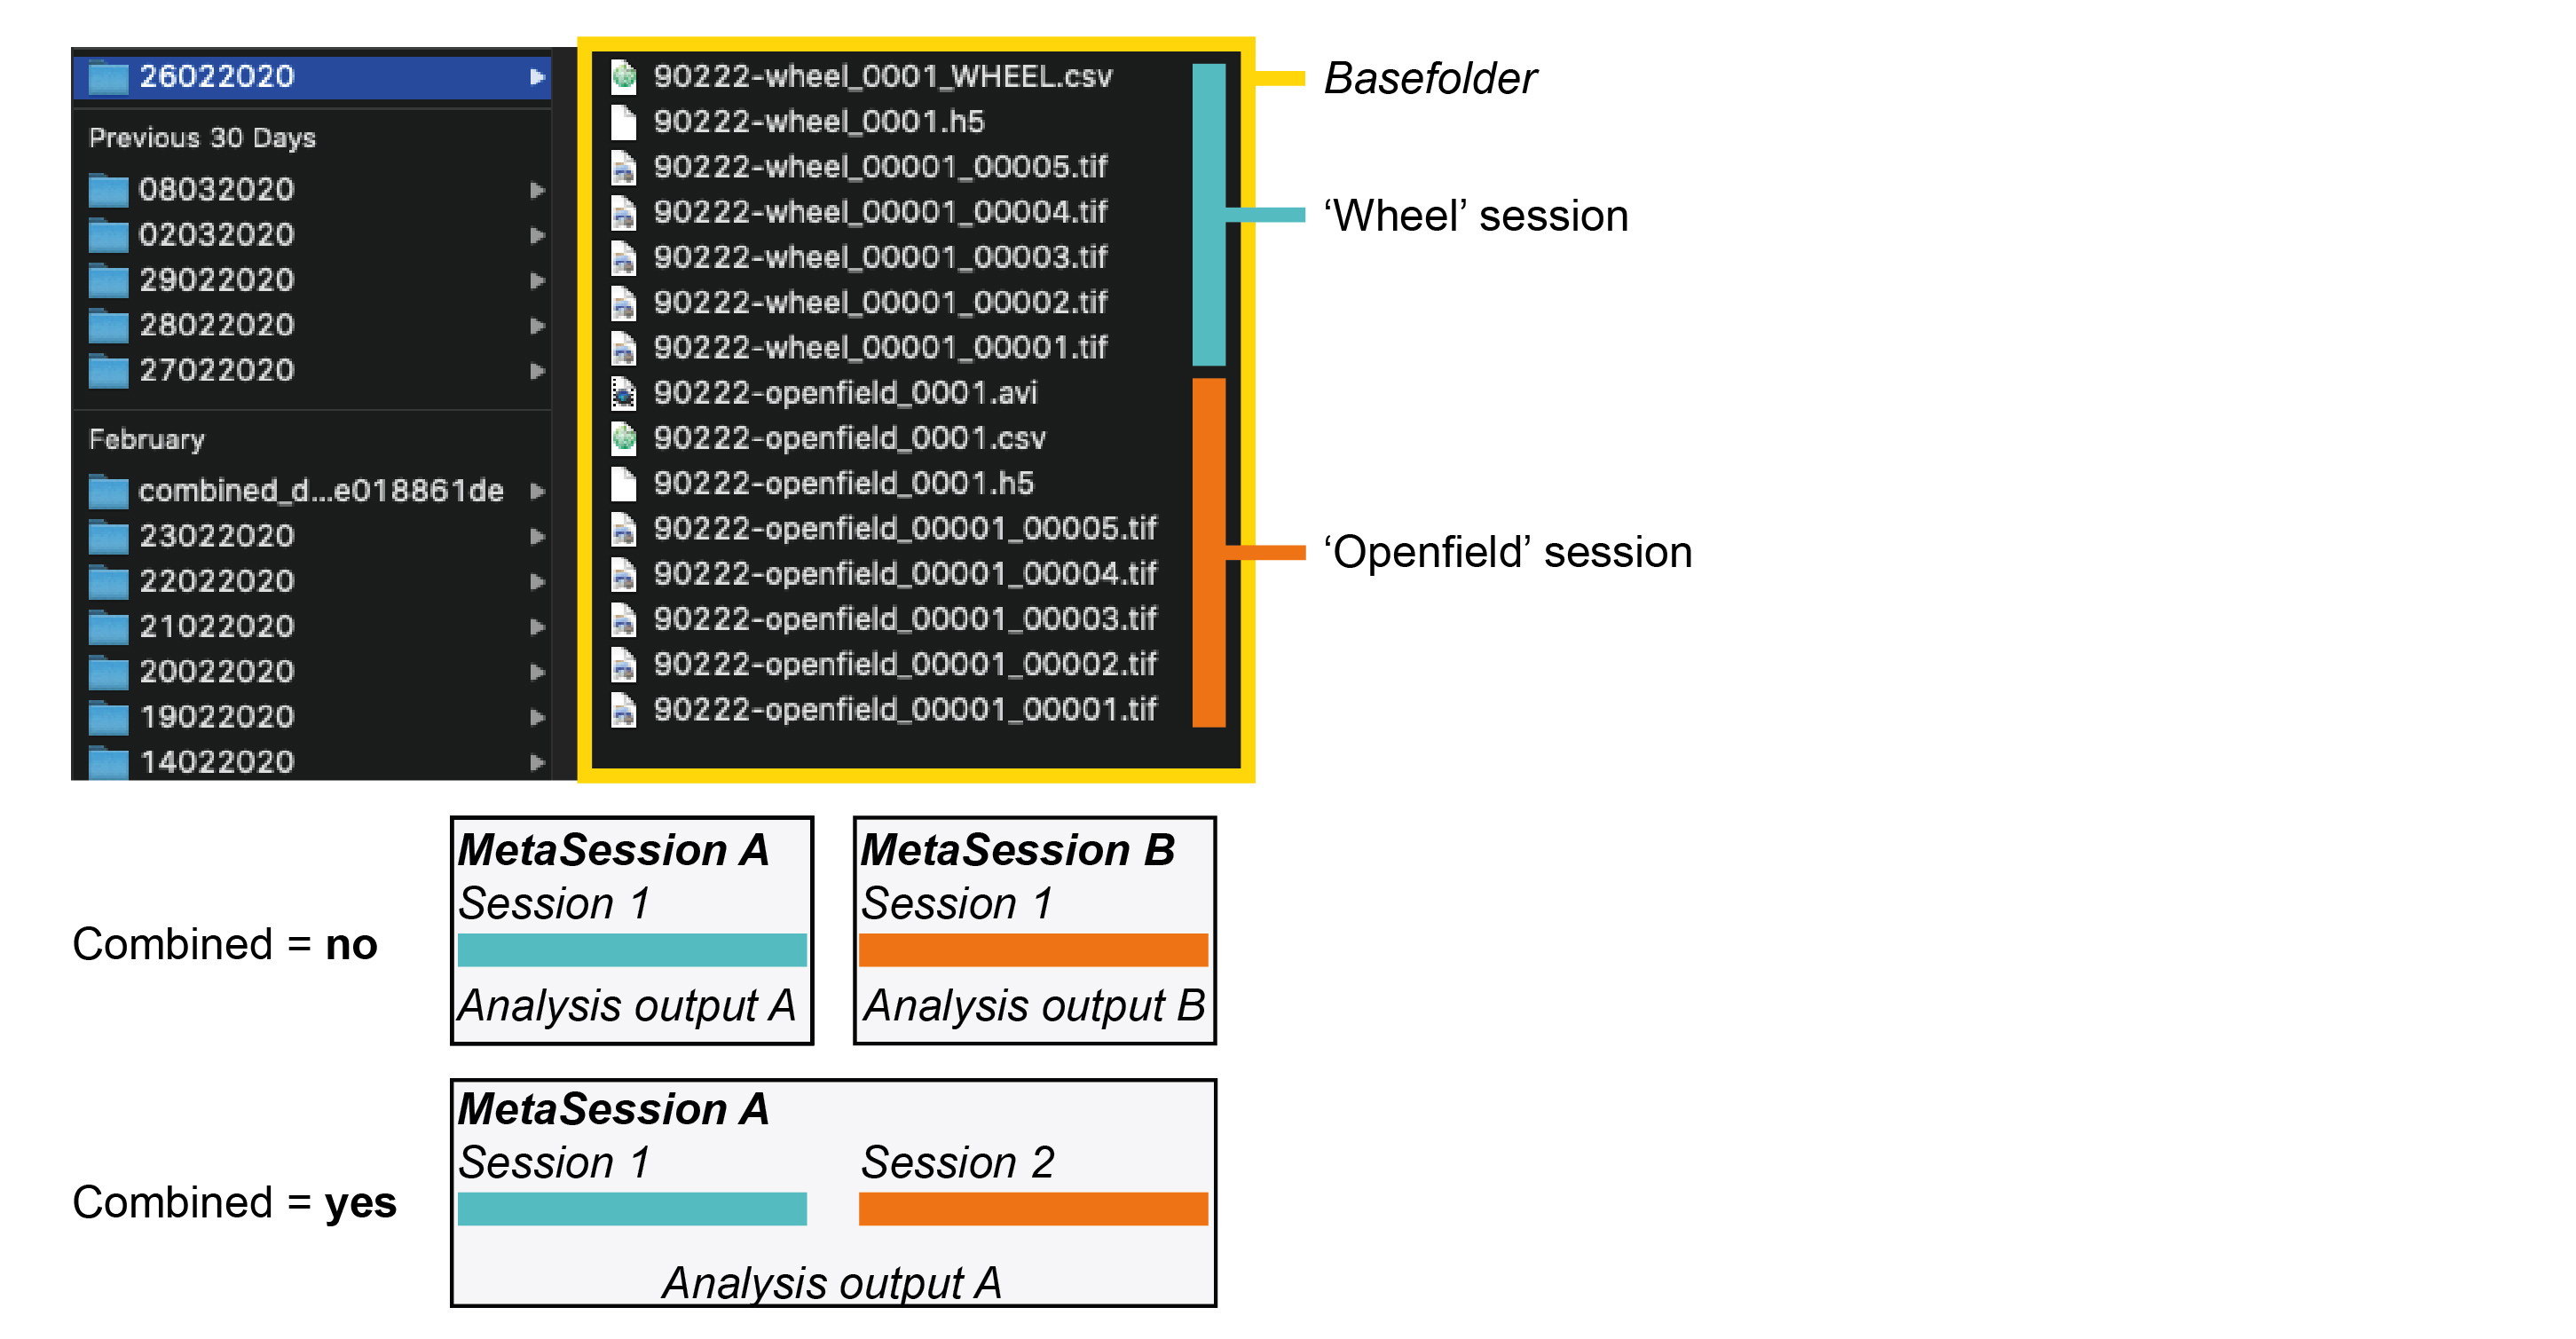
Scanimage creates filenames like
90218-openfield1m_00001_00001.tif, where90218-openfield1mis the name that the experimenter chose within scanimage for that recording. It makes sense to create a name consisting of the mLIMS subject ID and some keyword that identifies what kind of session it was (openfield, etc.). There is no need to specify the date since this information is saved within the header of recorded tif files.
Scanimage then has two counters:
_00001_00001.tif.The first counter refers to how many times a user clicked abort or recorded a full recording and then started again under the same name. This can happen, for example, if the pre-set number of acquired frames was estimated too low and the experimenter wishes to extend the current session. Or if there was a small problem with the recording (the subject twisted itself, …) and that current recording had to be interrupted briefly. This has nothing to do with the combined logic and these interrupts are considered to be insignificant and have no relevance for downstream processing. So no matter how many times the experimenter clicked stop and started again, this will all be stitched together and count as the same Session.
The second counter refers to the actual file number if tif splitting is activated within scanimage, e.g. if the experimenter specified that a maximum of 2000 frames should be saved within one file.
When the experimenter changes the name within scanimage (for example records a new head fixed session after an open field session), this will count as a new Session, regardless of the combined logic.
The combined logic determines whether multiple sessions within one folder should be analyzed together.
If combined = no, then each session found in that folder will get its own Session and MetaSession entries (all distinct from each other). If sessions are not combined, they will run through the analysis separately and individual output will be generated for each session.
If combined = yes, then each session found in that folder will get its own Session entry, but they will be grouped under the same MetaSession entry. If they are however in the same MetaSession, then only one, combined output will be generated (the imaging analysis is linked to the MetaSession level). Here is a diagram that I hope helps to clarify this further:
What happens if I forgot to copy over a file?
Just add the BaseFolder entry again. The ingest routines will recognize what is new and only add that.
What happens if I don’t like this or that cell from the suite2p output?
If you re-ingested the imaging analysis output once and then change something from within the suite2p GUI, you have to add the session BaseFolder again for the imaging pipeline to be notified of that change. Once re-added, the ingest routines will detect a mismatch between cell IDs saved in datajoint and the suite2p output and all datajoint results will be deleted for that session (those that derive from the imaging analysis) and re-calculated.
If things fail
Check the Imaging website (Miscellanious -> Jobs)
If there was an error in the
MakeDatasetsRecordingstable (so during the basic ingest), make sure the computer that runs theMakeDatasetsRecordingsjob knows about the file server that the raw data was saved.Ask Horst or Simon on Teams or via email.